Friday, March 30, 2012

Stuffed Animal: Goose

The fabric kind, not the eating kind, lighten up, people!

Anyways, if you had checked out my other fabric projects using Stampin' Up! fabrics, you might have seen a stuffed owl I had made.  My mother-in-law thought she'd pick me up a pattern book on stuffed animals while she was in our birth country.  Glancing through the book, which has technical terms in Chinese that I don't understand, but can probably figure out.  But it takes work on my part.  Then I saw the patterns.
OMFG!  This page contains patterns for 8 different animals!  There's lines going every which way.  I swear only Chinese people would try to save paper this way.  Argh!  Well, it wouldn't be so bad if I just tucked the book away and never to be brought out again.  Except, my daughter's sharp eyes spotted it.  She saw a goose in one of the pictures.  Ever since then, she pestered me about making her a goose.  I couldn't take it anymore after 3 days and I told her I would try to figure it out.  A couple more days of her asking whether it's done, I decided I had better make something for her or this will never end.  I braved myself and tried to figure out the pattern here and drew it on my fabric.  Without reading any instructions, I tried my best to figure out how the pieces were to go together.
Well, let me tell you something, pattern following and sewing is not for birds!  I have decided I'm more of a sew a kinda-straight line and call it good kind of a sewer.  It didn't really take that long.  But it sure was difficult to move the pieces through the machine sometimes.  I probably would do it a bit differently, if I absolutely had to make it again.  Oh yeah, it has no eyes, because I didn't want to sew by hand.  All the openings were top stitched closed.  There were many slipped stitches that had to be re-done.  But it's just me being an amateur, I'm sure.  Oh well.  She LOVES this thing, and that's all a mother can ask for!

Monday, March 26, 2012

Mika's Quilt

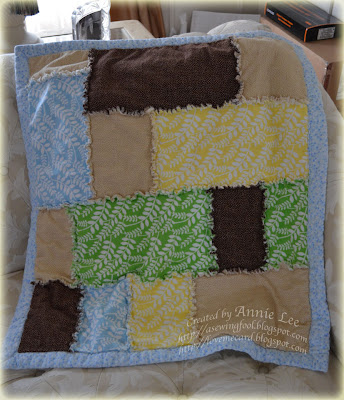
After I made my son's blanket the other day, my sister-in-law mentioned that she would love something like it for her cutie patootey dog-child.  Luckily, I still had some scraps left over and the dog is small, it was perfect.  I got to use up my left over fabric, minimal cutting required, I got to sew; and just a couple of hours later, our canine nephew got a new blanket!
Like I said, this is made with left over fabric, that's why there's different sizes.  But they sure look cute this way, don't they?  It really worked out well.  I decided to try the rag quilt look.  After I was done snipping all the fabric, it didn't look like it was going to be nice looking, like all the other quilts I've seen online.  But after one wash, it really ragged up nicely!  See!
And since this quilt is relatively small, I think maybe 28"x34" or something, I figured this is a good time to try my friend's binding method.  I don't have a link to this method, sorry.  I first sewed the batting onto the front panel.  Then I took a yard of flannel for the backing.  You have to make sure there's 3" allowance on all 4 sides.  With wrong-sides-together, I actually sewed the backing to the front panel to secure all the pieces.  Then fold the seam allowance in half.  Then fold it again to create the binding.
At the corners, on one side, just continue to fold the allowance in half.  The other side, you will fold it at an angle.  This created a bit of bulky corner for me, so I trimmed some of the fabric off.  Pin well.  Now, I've read that proper quilters do not sew the binding.  Rather, they hand stitch the binding.  And my friend's book also mentioned hand stitching the corner.  Well, if you remember from my last post, I'm not into inviting more work for myself.  Do you know how long it would take me and how terrible it would look if I had to hand sew???  No thanks.  I just let the machine do its thing.  It's not so pretty, but it works for me.

My conclusion after trying this particular binding method is that it works.   My problem lies in the size needed.  Basically you need extra 6 inches for length and width of the blanket.  So far I've only bought fabric that's 41-42" wide, so if I were to take out 6" for this binding method, it would leave the blanket a bit too small for humans, except for infants.  I guess this would still work if you were making baby blankets.  Well, anyways, this was a good attempt at something different. :)

Saturday, March 24, 2012

My First Quilt

Welcome to my sewing blog!  This blog is really meant for my own records of the stuff I've sewn.  I am a total novice sewer.  I only received my very first sewing machine about a month ago.  Ever since I unpacked it, I have been mesmerized with all the awesome projects you can do with this machine.

So far, my biggest untaking has been to make my 2yo son a blanket.  You see, he has grown out of his crib blanket (which is about 42"x42").  But he's not big enough for a twin size bed nor a twin size blanket yet.  I decided he needed an in-between blanket size.  Since I don't think they make those, and surfing the net has shown me that they're really not that hard to make, I thought I'd try it.

Front:
 Back:

I followed the tutorial from HERE.  I got these flannel fabric at my local J's.  I had bought a yard in each color.
The blocks on the front are 8.5" squares.  On the back, I just used the left over strips.
I had read about binding.  Watched videos.  Got some helpful hints from some friends.  In the end, I just decided it's not necessary for me or this blanket.  Hey, it does its job, and that's all I care for.  I'm not one to invite extra work when it's not needed. :)

Thank you for visiting me at my inaugural post.  PLEASE be so kind and leave me comments.  If there's some pertinent information that I should include when I share my projects, please let me know!
Related Posts Plugin for WordPress, Blogger...